

The comment I remember her saying was "the binding is so light and just lovely". That is why I like a single binding on a small quilt, doll quilt and often wall hangings. Notice there is no bump, or interruption on the surface of the quilt.

Step 1:
Cut you binding piece 1 3/4" inches by the length of the perimeter of your quilt. (sorry there are so many crazy lines lol)

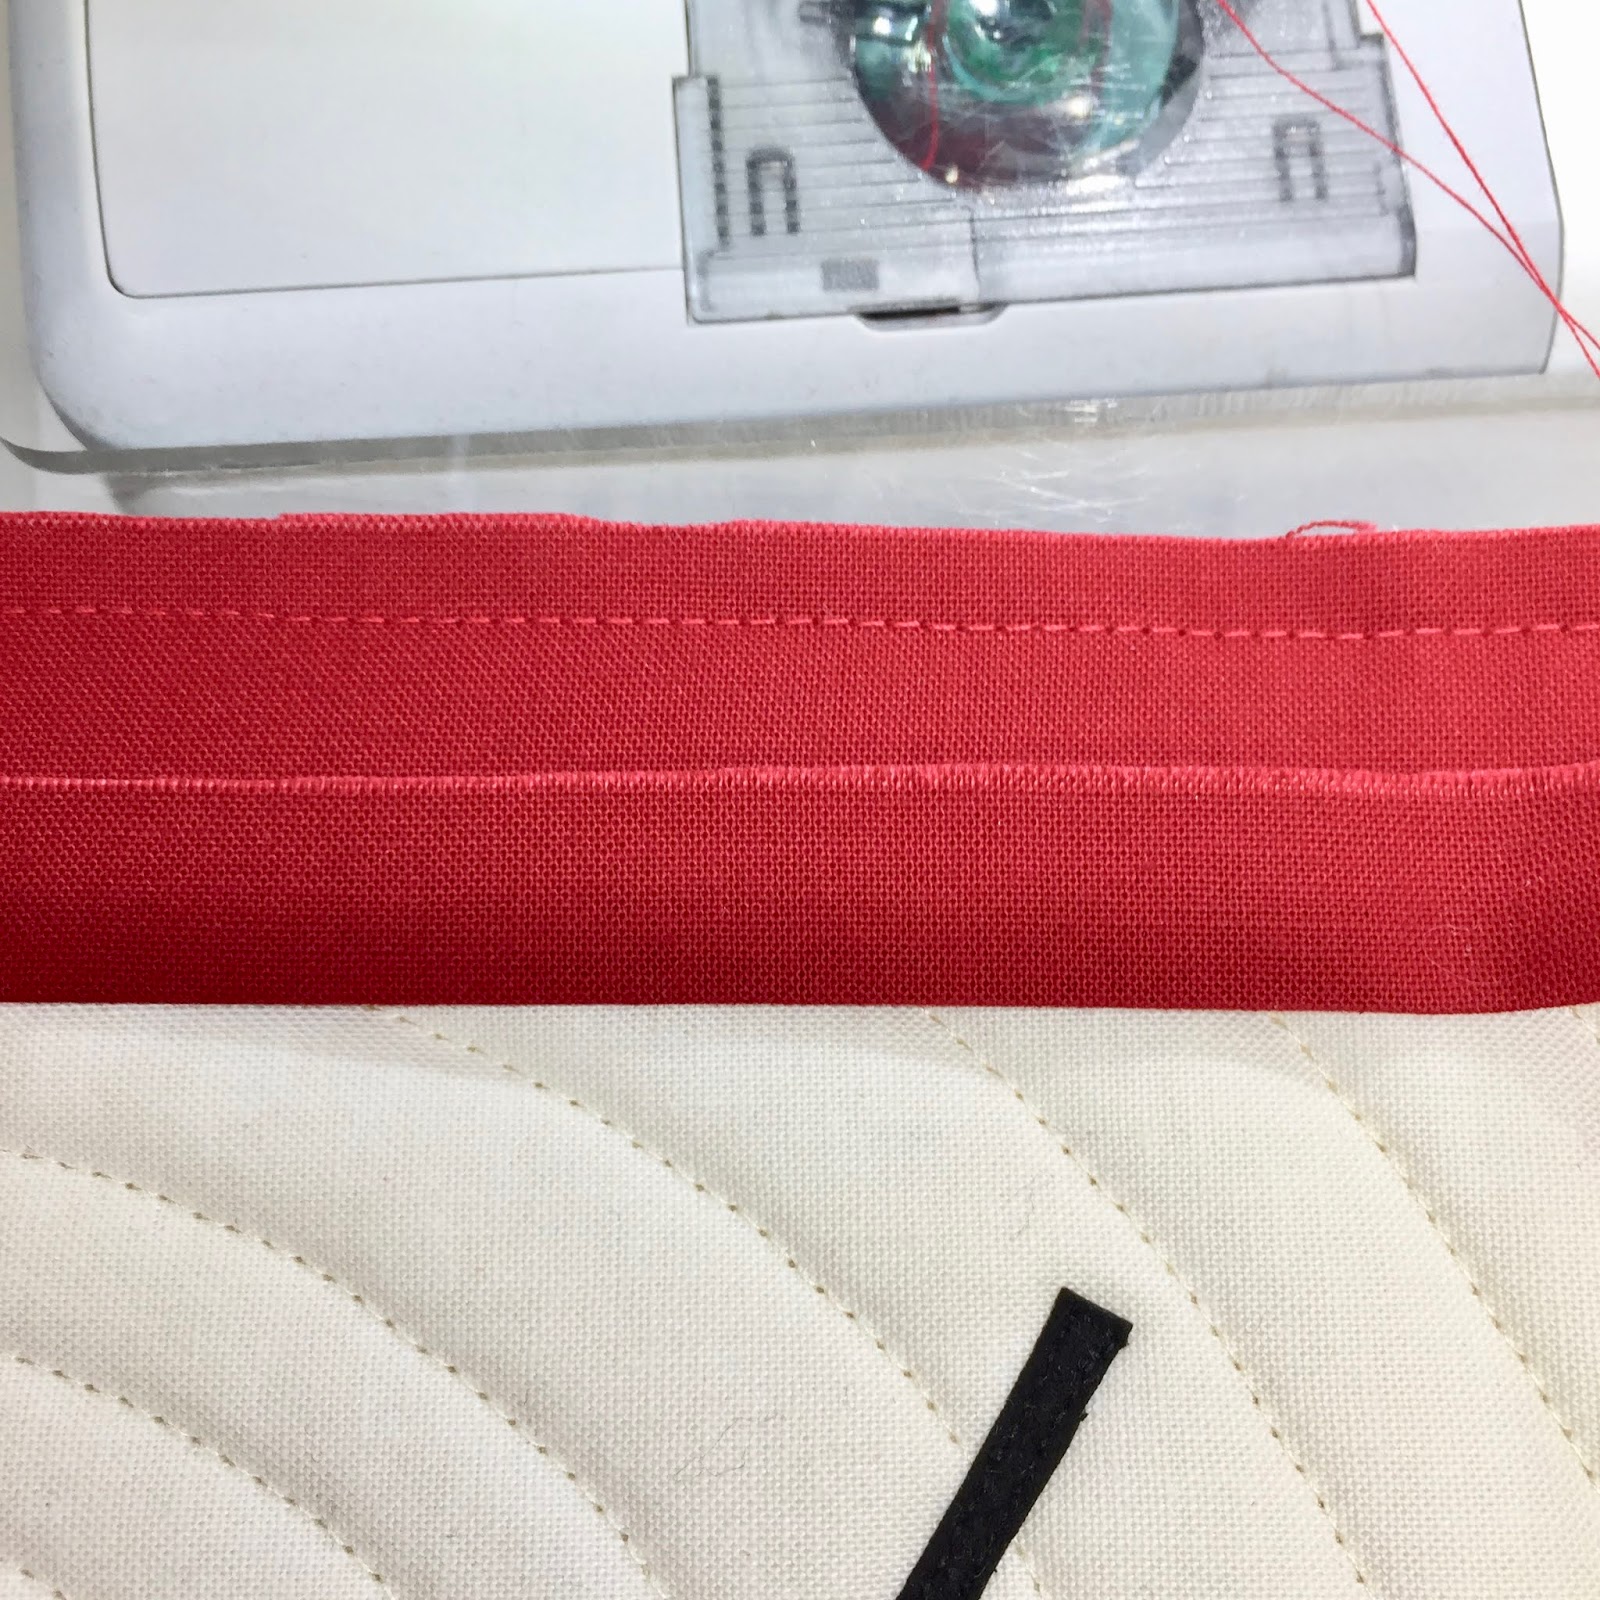
Fold one edge up 1/2" and press well. I developed this step here to help in the final steps of the process. You'll see its importance.

Sew with a 1/4" seam allowance, stitch the unfolded edge of the binding with matching thread. I start at the edge of the quilt.
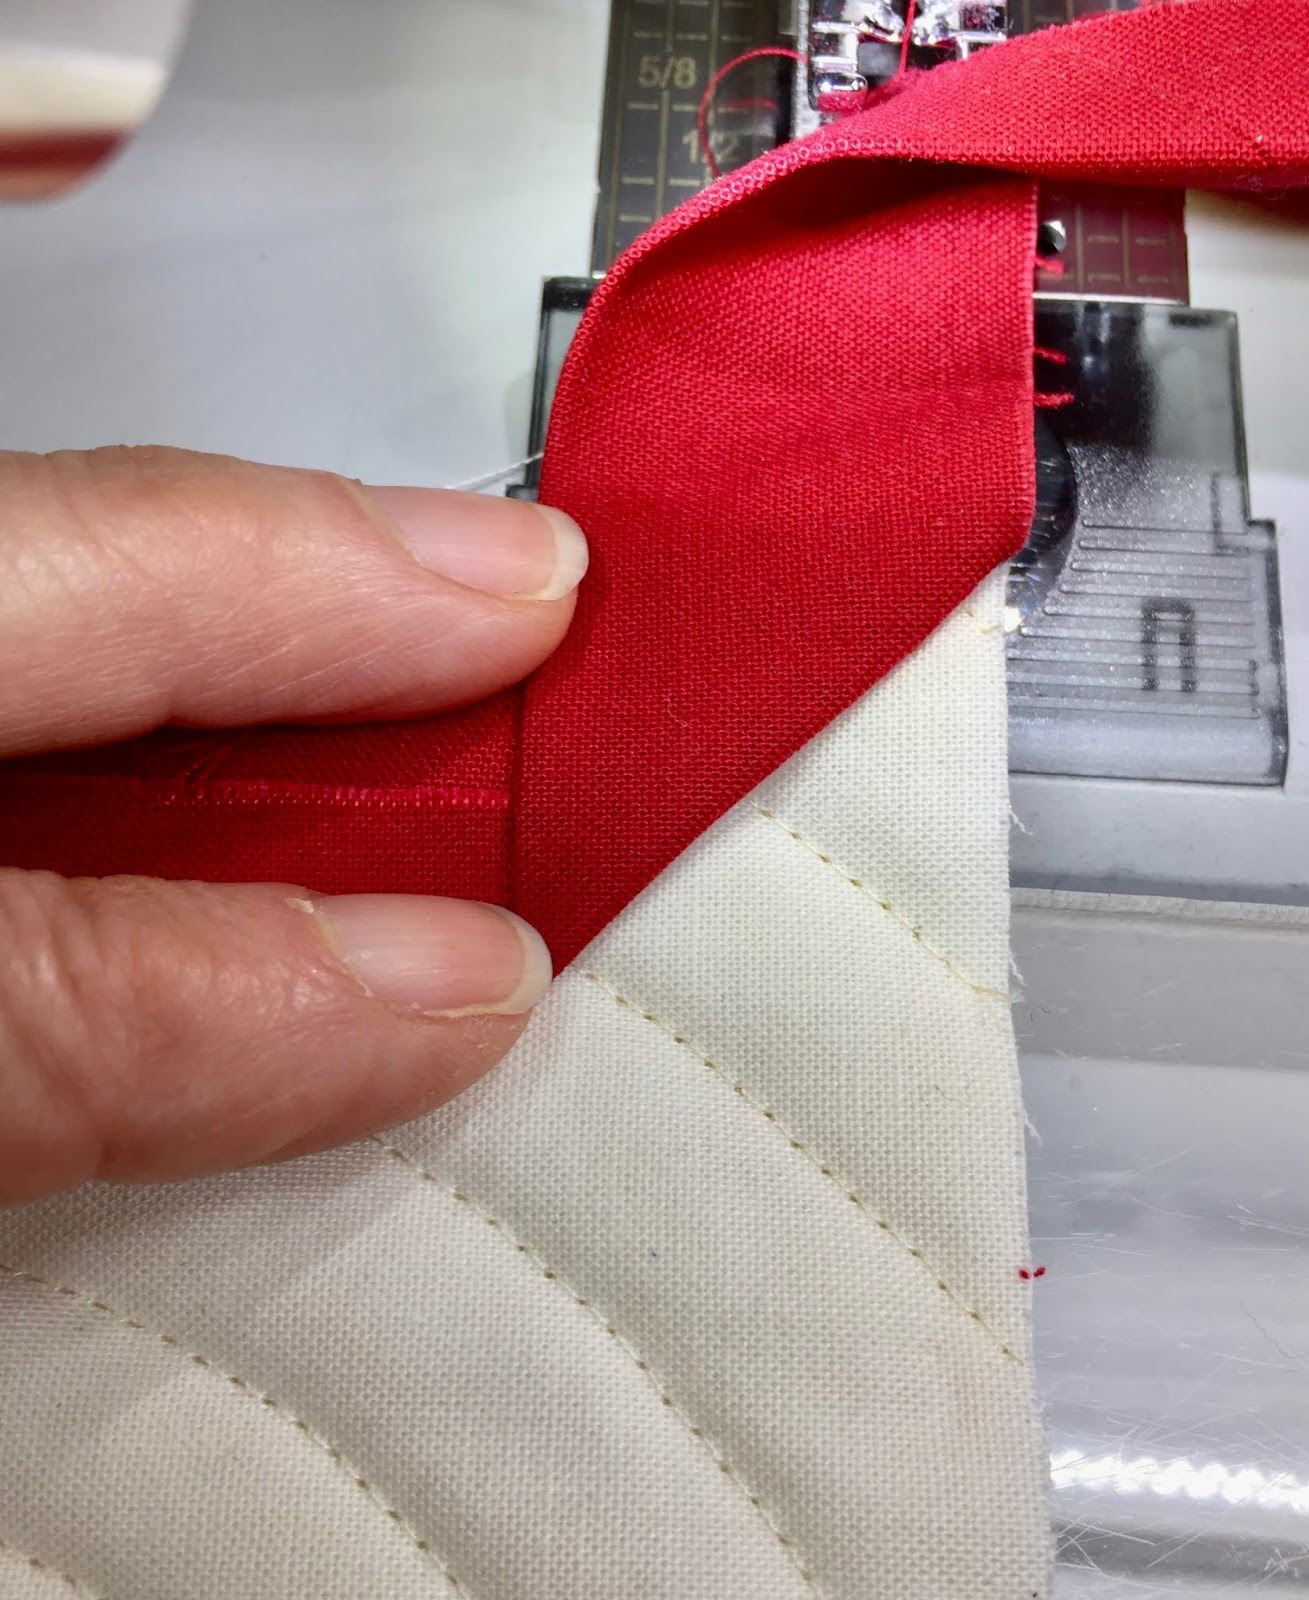
Before you arrive at the first corner, make a mark 1/4" inch from each edge with a pencil or in this case a Sewline white marker.

Stitch to the mark, pivot your quilt then reverse stitch to the edge.

Life the needle and pull your work out about 2 inches. Fold your binding up making a 45* angle, then fold it back down, lining up the edges.
Continue stitching through all layers. I do not use pins because I find they bend the work and I don't want to run the risk of hitting one with my needle. It is really bad for your sewing machine.

When I am nearing the end where I started, I finger press the binding around the quilt and pin it. **Why start and stop at the edge? On a piece that is only 9" I don't want to hassle with attaching ends in the middle. I find this less distracting**


Step 9:
I press all binding away from the quilt on the top so it is nice and smooth.

Flip the quilt over. It will look something like this. Okay, so the outside stitching isn't perfect, but the corner of the stitching looks good which is what matters.


I glue the binding in place using a micro-tip bottle with non-toxic school glue.

I sell these little 1 oz. refillable bottles in my Etsy Store here. There are many brands and bottles available online and in quilt shops.

Step 12:
I like to clip my corners to reduce bulk. I do this in two ways; I clip the batting and binding. CAUTION: take care not to clip any stitching. I did this once and cut a hole in my corner :(

I also clip some of the tail end of the binding.


Stitch the binding down using matching thread.

Nice and smooth, with no big bump. yay!


Giveaway: I'll send you a bottle of glue to try this method, all you have to do is leave a message today and let me know if you found the tutorial useful. I'll pick a winner next week.
Next week I'm also having a giveaway with a book and fabric!
Happy Friday
xo
I know a messy sewing room is one that's been used and creative! Great tutorial!! I'm not a fan of glue, but I can see how helpful it is using your method. I thought it was very helpful and it is always good to see alternative methods!!
ReplyDeleteI found the tutorial informative. Will give it a try!
ReplyDeleteFirst of all, if you call that messy, I will NEVER be able to show my sewing room in its normal state of confusion! (although I must say I do not currently have a dead doll on the floor!). I found your tutorial extremely helpful and easy to understand. I have never used glue for anything in my quilting. I say it is because I am a traditionalist, but in truth it is because I am lazy and don't want to add one more step. But, I am willing to try something new!
ReplyDeleteWonderful! Very clear instructions. Do you join strips on the bias for larger pieces?
ReplyDeleteI do on larger quilts, but I actually I really like this method of having 3 mitered corners and 1 straight if it is not going to be judged
DeleteYour tutorials are always so enjoyable, thorough, and doable. I have never done the single fold binding method, but, after reading your tutorial I am going to try this method now! The micro tip on the glue has to be of great benefit! Thanks for sharing your talents with us Barb!
ReplyDeleteThanks for the tutorial. I've tried using single fold binding a couple of time...both were okay. I just finished a squirrel mini last night with nine 1.5 inch broken dish blocks - I'll use your tutorial for the binding.
ReplyDeleteA messy sewing room = a busy quilter !! :)
ReplyDeleteThank you for this wonderful tutorial !!
I'm not a big fan of glue because I have more glue on my fingers instead of the fabric !! ah ah !! But I'm going to try this method !! Happy Friday Barb !
I always use single binding for small quilts and plan to try your method of starting at the corner. That would make it a lot easier. Yesterday I was binding a few small quilts and had trouble on 2 of them getting the closing seam to come out right. What a pain! I may have to remove some of the binding on one and redo it. I have only used glue for applique so I am interested in trying your method.
ReplyDeleteThanks for this tutorial! I’m looking forward to trying it on a doll quilt. I’m especially interested to see how that beginning/ending corner works out!
ReplyDeleteThank you for the tutorial, Barb. I've never used a single fold binding -- I don't usually make small quilts -- but when I do, I'll give your method a try. I have one question, though. It seems like cutting a narrower strip for the binding would work if you're sewing a 1/4" seam but I'm sure there's a reason why you cut the binding strip wider. My question is this: when you find the binding to the back does it end up wider than 1/4"? Is it closer to 3/8"? I love the disarray of seeing pieces of fabric scattered here and there in sewing rooms. They speak to me of energy and all the creativity that's going on in them!
ReplyDeleteGood tips, Barb! I always like seeing other people's spaces in a creative whirlwind!
ReplyDeleteThanks for sharing your single binding method. It looks very nice when finished.
ReplyDeleteI'll be sure to keep this post for reference. I usually do double fold binding, but I do like the look of this on small quilts that won't get much handling. I'll looking forward to seeing you at my guild (Crazy Quilters) in March. Thanks for the giveaway.
ReplyDeleteThanks for the tutorial, Barb, it was very helpful. I understand so much better when I have lots of pictures too.
ReplyDeleteI love to make small wall quilts and your tutorial is perfect. I haven't been happy with my double fold bindings on small projects, so I know I'll use your tutorial (which is perfectly done). I've never used glue for bindings, and its time I gave it a try. Thanks very much for thinking of your readers.
ReplyDeleteI have never seen a binding done this way. Thanks for the tutorial! I am with Coco, where is the snow this winter? Oh and I just retired, so more time to play in my sewing room.
ReplyDeleteGreat step-by-step tutorial. I appreciate the tips to press over 1/2 inch, ending at a corner, and then glue basting to hold in place. Thanks.
ReplyDeleteNice tute! It does give a very smooth finish! Personally, I enjoy piecing the binding seam so I start in the middle of a side. Messy room equals happy quilter!
ReplyDeleteLove seeing your creative space!! I haven't actually done a single binding, but I've thought about it for some of the small quilts I've done. I just get in the habit of doing it the way I've done it for years. Time for an old dog to try a new trick.
ReplyDeleteGreat tutorial Barb! I have always loved that bird quilt and seeing it on your header. Break with Coco was cute! My sewing space is also a total mess but good things are happening there so I am happy.
ReplyDeleteHave a great weekend!
Yes, very useful. My binding is always pathetic
ReplyDeleteThank you : ) I'll give it a try
I have never tried a single binding; I have not used glue for binding either. Ready to give this a try.
ReplyDeleteThanks Carol I hope you do!
DeleteI did find it informative and will try it on my next small quilt. Just taught a binding class tonight and we discussed using a thinner binding on small quilts.
ReplyDeleteI have used a single binding on two small quilts, but your tutorial is just wonderful and will improve my binding in this way! Thank you for a really clear and highly useful tutorial. I especially like the way you finish it on a corner1
ReplyDeleteThanks Meredith for the nice comments. I hope you give it a try.
DeleteI tried making a smaller width binding on a mini, but it wasn't great! I can't wait to try this wonderful tut! Thank you, Barb!
ReplyDelete-Jean ❤
Thanks Jean - wish I had your email to respond.
DeleteThanks for a great tutorial, Barb! I can't wait to try your method! Snow? What snow?? Your sewing room looks like mine did a couple of weeks ago, lol! There's still hope :) Have fun this weekend!
ReplyDeleteGreat tute! I learned doing a single binding a few years ago from a friend--I agree with you that it makes all the difference on a small quilt. My sewing room could use a good cleaning too--I feel your pain--lol!
ReplyDeleteIt's always good to learn new ways to bind! Thanks! I've pinned this post so I can refer back to it when I finish my next mini. I made pot holders at Christmas time, and sure could have used it then... and tell Coco she needs to go to Seattle. My son told me that the had 4 inches last night, that was going up to around 7 or 8. Personally, he and Coco can have all the snow!
ReplyDeleteI love single binding for small quilts. Your method is intriguing and I will definitely try it on my next small finish. Thanks for the tutorial.
ReplyDeleteI will try the single binding on a small wallhanging. If you enter your quilt to be judged in a show I’m surprised that the judge wouldn’t comment on three mitered corners and one not. Thanks for the tutorial.
ReplyDeleteThanks for the tutorial. I am eager to give it a try. Love the red wall hanging and a happy face is always in style. I would love to try your glue. Janice.snell@gmail.com
ReplyDeleteYes this tutorial is useful. I haven't tried single fold binding but always wanted to try. Not having to join seams makes this technique even more intriguing now!
ReplyDeleteAs a former Science guy this looks to me like a “Creativity Overload Explosion”. Luckily your room sucked the power out of the implosion part and made the Explosion!!!!! Made me smile. In Florida I have such a tiny stash and sewing area I can only create teeny tiny creative explosions.
ReplyDeleteMaybe I need to take over the next condo to me......
Jane WI/FL
I need to use this method for binding small items, I love how nice and smooth the binding lays using the single binding.
ReplyDeleteI could never show anyone my sewing room right now.It is in dire need of a complete clean up.
Great tutorial Glue why didn't i think of that. I plan on trying this on my trailing vines quilt Now to get the top assembled and quilted Thanks for the tips hope my corners improve
ReplyDeleteI liked the tutorial. And will give it a try.
ReplyDeleteI always read your blog and look forward to a post. I don't always comment. I am not commenting because of the giveaway. I wanted to say this is fabulous!!!!! I'm a rule breaker at heart... I've never liked how I was taught to do binding... perhaps you should make a ruler/tool?!?! May sound silly and simple and not needed to you... but, look at all the useless rulers we've all purchased and they are still making them !!! And we're still buying them! This would be a simple one that you could grab and not have all those lines etc - - a binding ruler.
ReplyDeleteHappy Sunday!
Thank you Barb for the informative tutorial. I have got to try this. Thanks again
ReplyDeleteThanks, Barb! I'll definitely be giving this a try!
ReplyDeleteLooks like a tornado hit your sewing room. But I just know so much fun was had during the process that it is no big deal.
ReplyDeleteThank you so much for that tutorial. I see what I've been doing wrong! I've been cutting the binding at 1 1/2" not 1 3/4". Will change that with the next little quilt. I understand your sewing room disaster storm. Do not feel badly quilting can get messy.
ReplyDeleteThanks for the helpful tutorial. Can you believe I've never used glue for binding? I think it's time I finally tried it. LOL
ReplyDeleteAnd as far as the mess in your sewing room, I am not one to judge. Let's just leave it at that.
Great tutorial and you're right, a small binding looks so much better on little quilts. A messy sewing room is the sign of a busy and creative quilter!
ReplyDeleteI haven't tried single binding, but looks like it would be great on small quilts. Thanks for the tute!
ReplyDeleteGreat tute! Thank you. I do double bindings, because that's what I was taught, but they never made complete sense to me. I'll try this on a small quilt someday.
ReplyDeleteLooks like a great way to bind a quilt Barb -- thanks for the tutorial. I guess you can't say no one was harmed in the making of this tutorial -- your dead doll says otherwise LOL. And tell Coco that the snow is west of you -- all the way across the country!!!
ReplyDeleteGreat tutorial! I have never seen the binding ended on the corner... very cool!
ReplyDeleteJust when I thought I had tried every binding technique there is, I find another. Do you ever use this technique on larger quilts? I'm going to try this soon and I just ordered a bottle of glue! Thank you!
ReplyDelete