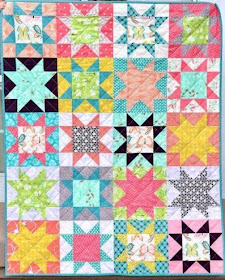
Good Morning! Here are the blocks we'll be swapping in 2020!!
Reproduction Blocks: Repro fabric with unbleached muslin. You can make them from one fabric or use a contrasting fabric for the star points.
Modern Blocks: Use 1 black and white printed fabric for the center and any bright solid for the star points.
The blocks are 6" finished.
You'll be making 1 block per person in your group; 35 modern and 40 repro, if we reach the maximum sign ups; for a total of 35 - 40 blocks total.
They are due to me 1/11/20 - firm
I will post a tutorial with detailed instructions and tips on making perfect 6" star blocks.
SIGN UPS ARE BY EMAIL ONLY STARTING FRIDAY 11/1
The reason for this is so that I can build a database of email addresses for sending out mailing and packing instructions and other information.
As you can imagine, it is a lot of work and takes a lot time to wrangle these swaps together but I think it has been well worth it in the past. It is always fun to receive the blocks and I hope you'll join in the fun!
I will be posting a reminder here and everywhere on Friday Morning.
You'll be in the swap when you receive a confirmation email from me.
I hope you like the blocks!
Pages
▼
Wednesday, October 30, 2019
Sunday, October 27, 2019
Cake with Friends and Oh My Stars!
Cake With Friends - made with 2015 Fun With Barb Swaps Blocks.
The backing which I pieced
It is pet approved and the perfect sized lap quilt for the upcoming chilly months.
I love the mix of fabrics and different muslins. Thank you to all the swappers. can you find your blocks?
I enjoyed putting together the fabrics for the cake stand blocks. If you want to make some see the pattern here.
It was inspired by this quilt which I saw on a teaching trip to Michigan. It belonged to Julie and you can see the post with her collection here.
Oh My Stars!!! Now that I have a couple of months off I'm going to host another block swap! Here is a big hint~
I will do a post on Wednesday with the size and color details.
Sign ups will begin on Friday, November 1st.
Blocks will be due to me by January 11, 2020.
Have a wonderful Sunday
xo
Tuesday, October 22, 2019
Ninigret Quilt Show
Hi Quilters and Friends!
Today I'm sharing photos from last weekend's Ninigret Quilt Show.
Here is my favorite quilt in the show.
I love the texture and variety of these flowers.
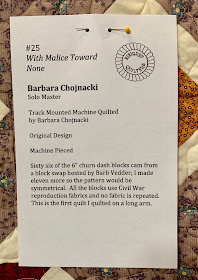
A Fun With Barb Swap Quilt made by Barbara.
I really like that dusty lavender setting fabric. It works so well with the repro churn dash blocks.
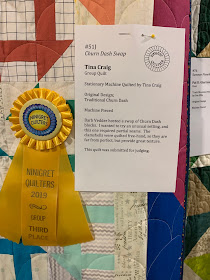
Tina's Modern Swap Quilt with partial seams. I'm always amazed by Tina's creative settings.
As you might have seen on Instagram, I won the Best of Show award for my Jubilee Quilt. The lighting wasn't great at the time I took the photo so I has a lot of shadows.
I always wondered how it would be to win this award, but I never imagined actually winning it.
I also received a Vendors Ribbon from Barbara of Six Gables Designs. Thank you Barbara!
There were many many more beautiful quilts in the show, but I was busy working a lot of the time I was there so I missed taking many of them. I am also trying to "live in the moment" more.
I'll be presenting a lecture at First Dutchess Quilters Tomorrow night. Click here for details.
Today I'm sharing photos from last weekend's Ninigret Quilt Show.
Here is my favorite quilt in the show.
I love the texture and variety of these flowers.
What a bold mix of fabrics and textures.
So I'd like to take this opportunity to say that guild shows are my favorite shows. The quilts are made with love. You can see that. Are they all perfect? Absolutely not but they are REAL.A Fun With Barb Swap Quilt made by Barbara.
I really like that dusty lavender setting fabric. It works so well with the repro churn dash blocks.
Tina's Modern Swap Quilt with partial seams. I'm always amazed by Tina's creative settings.
Great historic quilt, I wish I knew more about it.
It won viewers choice too. We have a viewers choice award each of the 3 days and there 3 different winners. I love that.
This quilt was made from a kit and is it stunning! As you can see it won many well deserved awards.
I know this is hard to read so I'll just tell you, her husband gave her the kit for Christmas. It took over 225 hours. Great name for it.
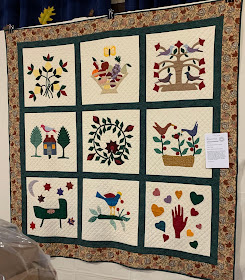
Beautiful Applique' quilt and sweet story.
Another great quilt by Susan. Ya'll know I love Frida!
Another incredible quilt by Tina. This is her temperature quilt. Her machine quilting is wonderful. She won a well earned NQA Outstanding Achievement in Quilting award. Congratulations Tina!
Here are a couple of wonderful President Quilts and a great Hexie Halloween Quilt.
What a nice surprise! Alice Payne was awarded one of the Vendors Choice Ribbons. Thank you CT Quiltworks!
My Gifts from the Sea Quilt was awarded a ribbon for use of Embellishments 😊
I always wondered how it would be to win this award, but I never imagined actually winning it.
I also received a Vendors Ribbon from Barbara of Six Gables Designs. Thank you Barbara!
There were many many more beautiful quilts in the show, but I was busy working a lot of the time I was there so I missed taking many of them. I am also trying to "live in the moment" more.
I'll be presenting a lecture at First Dutchess Quilters Tomorrow night. Click here for details.
It will be nice to have a completely free week next week. In the meantime, I'm with coco.....
Tuesday, October 15, 2019
My Bleeding Heart
Hello! Sorry for the delay I ran away to Las Vegas with my daughter and I came home to a quilting trip.
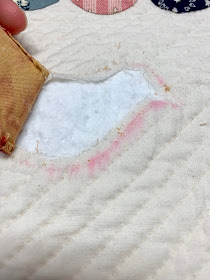
Some of you may wonder how in the world this happened. I generally use a spray bottle to remove the blue lines as I quilt. All was fine until I hit that fabric which is a little older and obviously had not been pre-washed. ooops.
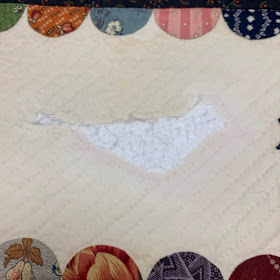
The first thing was to take off the bleeding bird. I carefully removed it with a new sharp seam ripper and tiny scissors. At this point I am grateful I outlined quilted the bird because it stabilized the area.
To spot treat the area, in a small bowl I made a mixture of:
Few drops of Dawn Dish washing Liquid
Oxi Clean
Water
I BLOTTED the stain with a white washcloth and let it sit. I watched it carefully and checked it often, then blotted it with clean water.
Uh Oh!! now I have a water stain but you can see that the bleed is coming out.
After it is dried, it looks good to me. I still see a pink shadow and water stain but feel (hope and pray) it will come out in the tub.
Ta-Da! Here is the new bird which has carefully been appliqued into the space. I did have re-quilt the outline a little, but it was a good fix.
okay, into the tub. (See the process in my last post) During the first rinse there was a release of other reds but it all went down the drain. Yay
After I gently squeezed out all the water I could, I carefully loaded the wet quilt into a plastic laundry basket to take it down to my washer so I wouldn't put strain on it. A wet quilt is very heavy!
I loaded it into my washer and used the rinse and spin cycle, no detergent and let the washer spin out more water.
(BEFORE you dry it, check it for any other bleeding. If you have any, back to tub you go for a longer soak.)
I put it in the dryer on low and literally stood there to make sure it didn't twist or ball up. I let it tumble for about 10 minutes until it was damp dry.
I placed a clean sheet on top of carpeting and spread the quilt on top tugging gently and smoothing to block it. I usually set up 2 oscillating fans on the floor to help in the drying. I check often to make sure it is keeping its square shape. (I have done this in the basement and spare a bedroom where I can close the door because; coco and nutmeg)
I like this photo as it shows the bird before it bled. As you can see it is a prominent place.
A lot of people have commented on my clamshell edged border. It's funny I thought I was first to use them this way, but I recently saw a quilt on line with this design made before mine. There you go; nothing is new.
Here is how I lined them up.
I took Coco to the Beach Saturday. I love a cloudy gloomy day at the Sound. We had the beach to ourselves.
I wonder how old this shell is. It was crusted with tiny shells and other sea bits.
It really demonstrates how the tides and time works on shells.
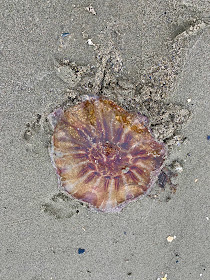
This poor jelly washed up. I very carefully rolled it back into the water. I hope it lived.
Thanks for so many of the nice comments on my quilt and have a great week!
xo
The first thing was to take off the bleeding bird. I carefully removed it with a new sharp seam ripper and tiny scissors. At this point I am grateful I outlined quilted the bird because it stabilized the area.
To spot treat the area, in a small bowl I made a mixture of:
Few drops of Dawn Dish washing Liquid
Oxi Clean
Water
I BLOTTED the stain with a white washcloth and let it sit. I watched it carefully and checked it often, then blotted it with clean water.
Here you can see the the Dawn mixture on the stain.
I treated this problem for 3 days!
After it is dried, it looks good to me. I still see a pink shadow and water stain but feel (hope and pray) it will come out in the tub.
Ta-Da! Here is the new bird which has carefully been appliqued into the space. I did have re-quilt the outline a little, but it was a good fix.
okay, into the tub. (See the process in my last post) During the first rinse there was a release of other reds but it all went down the drain. Yay
After I gently squeezed out all the water I could, I carefully loaded the wet quilt into a plastic laundry basket to take it down to my washer so I wouldn't put strain on it. A wet quilt is very heavy!
I loaded it into my washer and used the rinse and spin cycle, no detergent and let the washer spin out more water.
(BEFORE you dry it, check it for any other bleeding. If you have any, back to tub you go for a longer soak.)
I put it in the dryer on low and literally stood there to make sure it didn't twist or ball up. I let it tumble for about 10 minutes until it was damp dry.
I placed a clean sheet on top of carpeting and spread the quilt on top tugging gently and smoothing to block it. I usually set up 2 oscillating fans on the floor to help in the drying. I check often to make sure it is keeping its square shape. (I have done this in the basement and spare a bedroom where I can close the door because; coco and nutmeg)
It may take several days to dry. I flipped it over and dried it back side up too.
Here are a few more process photos. The quilting lines before I decided to double them.
It was worth adding the extra lines. I like so much better!I like this photo as it shows the bird before it bled. As you can see it is a prominent place.
A lot of people have commented on my clamshell edged border. It's funny I thought I was first to use them this way, but I recently saw a quilt on line with this design made before mine. There you go; nothing is new.
Here is how I lined them up.
I sew basted them in place (by machine) long the edge.
I hope that answered most of you questions, if not just leave me a comment and I'll answer them.I took Coco to the Beach Saturday. I love a cloudy gloomy day at the Sound. We had the beach to ourselves.
I wonder how old this shell is. It was crusted with tiny shells and other sea bits.
It really demonstrates how the tides and time works on shells.
This poor jelly washed up. I very carefully rolled it back into the water. I hope it lived.
Thanks for so many of the nice comments on my quilt and have a great week!
xo


