Pages

Tuesday, April 29, 2014

Design Board - Finally!

After almost a year without one, I finally have a new design board in the sewing room.  It isn't hard to make, but takes some planning and supply gathering.   Here it is at work yesterday with my Hot Flash blocks.  I am waiting for new fabric for the last block.


Supply List

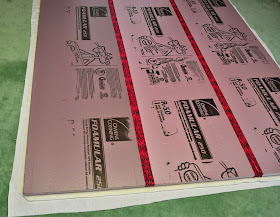
2-3 sections of 1" foam house insulation (available at Home Depot or Lowe's)
Utility knife
Ruler
Carpenters Ruler
Pencil
Duct tape
Neutral Flannel - I ordered 100" wide flannel from eQuilter.com
Batting large enough to cover your sized board.
Hot glue gun
3" nails

Step 1:

Decide how wide and tall you want your board to be.  I needed to shorten mine as it came in 8ft lengths.  My board is 72" wide by 77" tall.


Lay your sections face down on the floor and push the tongue and groove sections together.  Duct tape the seams to secure them.


Lay your batting and flannel over the section and trim.  Batting should be about 2-4" larger and the Flannel 3-5" larger than the board section.


I invested the time in steam pressing the flannel.  I used a little "Best Press" light spray starch.  It turned out nice and smooth.


Now lay the flannel on the floor, then the batting being careful there are no stray threads or any between them.  Smooth everything out nicely.


Carefully center the board on top.


This is my favorite glue gun.  It is a cordless heavy duty one.  I've had it for years and it comes in handy for all sorts of projects.


Pull the flannel and batting around to the back and glue down.  When you've done one side, be sure and pull any  slack from the other side before glueing it.  Glue the center then the edges on the corners.  Don't sweat it too much as you won't see it when installed.


Here is the tricky part.  Installing it.  We had several false starts as you can see here.  At first we tried dry wall anchors.  We kept hitting studs and ruining the anchors.  We really boogered up the wall and ceiling and didn't we?


Coco is so over this whole thing.


Here is the finished board.  If you don't want to install it, you can lean it up against a wall, or slide it behind the door or store under a bed.


Using a stud finder, we nailed mine into studs with 3 inch carpenter nails.
Hooray!  Here you can see the side.  You can pin your layered pieces into the foam.


I installed mine at the top of the wall because of the outlets.  If I need to, I can pin blocks at the bottom.

I can not tell you how much I rely on my board for designing quilts, auditioning fabrics and taking photos.  I've added this as a page at the under my header for quick reference.

I am so happy to finally have mine up and ready!

Tuesday, April 22, 2014

The Post Man Cometh!

Here is the lovely doll quilt I received from Debbie in Lori's Doll Quilt Swap.  Thank you so much Debbie!  Your workmanship is lovely and the big primitive wool flower is really fun and adds such a great touch of whimsy the quilt.


She sent a lovely card that matches the color of the quilt.  Debbie put a nice label on it and a sleeve too.  You can see the nice meandering quilting.


I was doubly lucky yesterday.  My friend, Susan, gave me this beautiful bird pin that she made!  The stitching is exquisite!  I need to find a new spring coat for it.


Hanna found this tiny nest in the park on a dog walk.  You can see the single silver hair across the front.  I am always amazed at how well made this tiny dwellings are.

Thanks again Debbie, Lori and Susan.


Friday, April 18, 2014

Spring? Where?

Blog News Bulletin!  I have somehow lost my google friends followers :(   I've tried to get them back, but blogger is having an issue.  also, if you follow me on Bloglovin, you may have to "re-follow" as I had 2 domain URLs and there were followers on both.  I now have 1 domain URL and lost the other followers. - sorry for the inconvenience, hopefully you'll still find me.

This week I needed a little thank you gift, so I decided to make a composition notebook cover.

Here is the front.   I just love this fish.  It is the only thing I planned, the rest is random.


And here is where you write all your brilliant thoughts and ideas.


The inside, where the notebook covers slip into the quilted cover.


The back.

I use the direction on this blog.  I reduce the overall width to 26" to 26 1/2" inches depending on the notebook.  You can measure yours first for a good fit.

Here are some of the steps:

Layout a rectangle of strips, blocks, strings or whatever piecing you like.  Or you can use a beautiful whole piece of fabric like I did for Christmas 2010.  See those covers HERE.


Piece or choose a lining fabric.  It doesn't have to be fancy or pretty, but I happen to like fancy and pretty for most things.  cut a piece of batting roughly the same as the back.


Machine quilt the three layers like a little quilt.  I use 2 quilt halo when I free motion quilt.  You can check them out here.


The rest you can find on the link above.  Although it takes a little time it is easy.

Can I just say, no wonder I make mistakes at the machine!  Look at all these distractions!  Watching the Good Wife, while checking the on-line instructions and sewing.......


I decorated the window sill above my kitchen sink again.  I used to have 2 mantels to decorate, so I'm using this space in the same way.  It is super hard to photo graph anything near a window.


Do you see spring outside this window?  I don't!  A few bunnies on the front hall table with my carrot tree.


Despite the snow and ice on Wednesday, the Pansies out front look great :)


I wish you all a Blessed Easter, Joyous Passover or just a Happy Spring Weekend.

Wednesday, April 9, 2014

Doll Quilt Fanfare

Happy Hump Day!  I finished my doll quilt for Lori's swap!

I used one of my favorite patriotic toiles' on the back.  Not a civil war print, but that's okay.

Here are 2 video clips that shows how I machine quilted the fans on the edge of this quilt.  I really need a manicure and younger hands.  I even use Palmolive and Madge lied!


Here is the finished little fan.  (you can see in the upper right corner where I marked it wrong.  No problemo, just change pen color and remark.)


I washed it in the kitchen sink this morning with regular detergent AND Clorox2.   The clorox 2 is the secret to removing the washable markers.

Look at all that released ink!  You can use the washer for larger quilts of course.


Thank You Brenda of Scraps and Strings, for the fun package.   I was so happy to win your Needle Book Giveaway.  The extra goodies were a fun surprise.

   
And lastly:  Go Connecticut!  UConn won the Men's and Women's  College Basketball Championships!  


Thursday, April 3, 2014

What am I DOING?

Happy Friday!  I don't know how a whole week slid by.  But there it is.

I'm still pulling the rooms together that got painted but in the meantime here is what's up:

I've basted 2 more of my Hot Flash blocks.  This one has a new surprise~


I took photos outside on the front yard rock outcropping.


 It was sunny right before I got my camera and blocks, naturally.


I'm working on my doll quilt swap from Lori's blog, Humble Quilts.  Quilting little fans.


I hope my swap recipient likes it.


Spring!  Just this week I swapped out the little artificial pine trees for fresh pansies in the urns.   As usual coco is wondering what I'm doing.....


Tip of the day:  if you have these side-light windows, put your planters in front of them so you can enjoy them from the inside too.


Daffodils coming up - hooray!!


I'm working on the border of my Jubilee quit.  I haven't been quilting for about 2-3 weeks - where does the mojo go?  Hopefully I'll get back in the groove.


That's all the news I have - hope you had a good week!