Pages

Tuesday, August 25, 2015

What's In A Name?

Hooray!  I did it.  I finished my Civil War Nine Patch Swap Quilt from last years swap.  Woo Hoo.
Last Friday I marked and fused the layers together.  Saturday morning I challenged myself to be binding it by Sunday night.
And I did it!  Here I am celebrating with a glass of wine as I glue baste my binding in place.
Here is a another view.  I used 6 different reds, 4 different chocolate browns, 6 different reds and 4 different tans to set the 100 blocks swapped.  It finishes at 49" x 61" - Just my size.
I did straight line quilting with antique gold #100 weight silk thread, my walking foot and a 80/60 microtex needle with a single hole throat plate.
I used this wonderful Windham Revolutionary print on the back.  I know it's a totally different political event, but it's my quilt so I can mix it up!
 I love the toile'-ness of this print.  It matches some transfer ware dishes I have that you can see here.  that link also includes a quilt I started and never got back to.
Finally - I caught up with my Stars in a Time Warp blocks.  Here are the five new babies on the block.
I'm not sure where everyone is, but it's been a bit lonely here in Bloglandia.  Are you all still here?  After a long busy and face-paced weekend together, my quilt took a little rest on the chaise lounge.
So....what's in a name?  I think I'm going to name this quilt "Reconciliation" what do you think?

Thursday, August 20, 2015

All Dressed Up

and going to Bolivia via Lori.   Here are some dresses I've made this week.  I was inspired by my friend, Nancy, after seeing how cute hers were.  I was short on the teapot fabric so I added a front panel.
 I decided to make my own bias tape since I have an abundance of fabric.   I used the pattern at Nancy Notions.
They looked like little bells blowing in the wind yesterday.
These are the big girl dresses.   I tried to make them a little more sophisticated.  I love this limey yellow and blue combination.  The pocket was inspired by Nancy too.
Instead of quilting I've been doing these summery things:

Watching and feeding the hummers.  Here is a video I took last week.  It's been Battle Royal lately even though I have three - yes 3 feeders!
I've been taking this monster to the State park for lots of swimming time - her favorite thing to do.  coco looks 10 lighter when wet.  I'm so grateful that her leg has made a complete recovery!
We have a new toy.  A bright green kayak I've dubbed the "Green Hornet" to play with when there isn't enough wind for our little laser.  Here are both toys on the Sound at one time.  I love water and beach fun.

After my fan marking tutorial I received some questions about marking pens.  Click here to see a post that I did on the subject.  Here is a link on how pin baste on a table.  Thank you for the great feedback and the stencil orders.

Thank you all so much for the quick and overwhelming response to this years swap.  Emails have gone out to both groups.  I'm sorry to those who didn't make the cut off this time.  I've already picked out a block for next year!

Have Fun!

Wednesday, August 12, 2015

Block Swap 2015!

Both Swap Groups are closed - thanks everyone!  I'll be back to regular blogging.

Modern fabrics should be bright - no pastels
Civil War prints should be medium to dark.

Here we go!

If you want to be in this years swap, you must send me an email at barb.vedder@gmail.com.  I will send you a confirmation.  Sign ups will close when I get the limit or September 1st, which ever comes first.

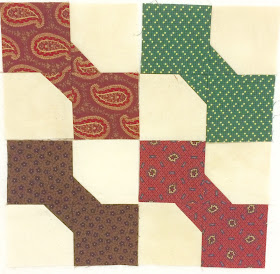
This year we will be swapping, 4" finished bow tie blocks.  You'll be making blocks and sending them to me.  I'll swap them and return to you.

I'm going to limit the groups to 40 in each.  If we get that number, then we'll be swapping 80 blocks for each group.  I won't know the exact number until I close the sign ups.

Once again we'll have two groups; Civil War fabrics and Modern fabrics.

Modern blocks will use light grey low volume print or solid grey with a bright modern fabric (no pastels).  Please use only good quality, 100% cotton.   Here are some blocks that I've made.
If you are wondering what I mean by low volume grey here is a pinterest board to give you the idea.

Civil war blocks will use muslin with one civil war reproduction medium or dark print.  Any off white muslin will work and work well with others.   Please use only good quality 100% cotton fabrics.   Here are some blocks that I've made.

Instructions:

Cut:
2 - 2 1/2" squares of printed fabric (the bow)
2 - 1 1/2" squares of printed fabric (the bow)
2 - 2 1/2" squares of background (muslin or grey)
Mark a line diagonally on the smaller square.  Take care, you may want use a sandpaper board as the pieces are quite small.  I glued sandpaper to a clip board for mine.
Sew the small square onto a corner of your background just to the right of the drawn line.  This allows for the tiny bit you loose when you press.
Press toward the dark side.  I like to use a hot dry iron for this as steam sometimes causes skewing of the fabric.
Trim away the background and the first layer of printed fabric.
Sew the 2 1 /2" printed patch to the to the background patch.  Press toward the bow fabric- please don't skip this step!
Sew the two units together.  Press the last seam OPEN.  Please press this seam open so they lay flat.  Last time a few swappers who didn't do this step.
Now admire your little 4 1/2" (unfinsihed) little bow tie block.
I added this information to a tab at the top for easy reference.

Here is some inspiration - but remember to use our swap fabrics~

You can see more on my Bow Tie Pinterest Board.

In Review:
  • Send me an email and let know which group you would like to be in.
  • Civil War Era reproduction fabrics with muslin.
  • Modern Bright fabrics with grey or low volume grey print.
  • I am setting a limit of 40 for each group.
  • Follow my instructions carefully and use your very best sewing and pressing skills!
  • Deadline:  in the mail to me on or before October 31st - no exceptions.
I hope you'll join!  I think it will be great fun!

I will send an email after sign ups close with all the details on final block count, etc.


Friday, August 7, 2015

I'm a big Fan......

of fan quilting!

As you all know, I designed and manufactured a large fan stencil because I couldn't find one on the market that was the large size I wanted.  I made my own for this quilt.
I was asked by my friend, Sheila, to do a tutorial on how to mark a quilt with this stencil.

Let's pretend this cardboard is a wonderful quilt top.
 I line up the stencil with the bottom and right side.
 I mark the first section, then the second section.
 Here is how it should look.
Then I move on to the third fan, lining up the first section of the stencil with the already marked whole fan.
 And viola'
Now I move up to the next row.  I line up the little quarter circle where the previous rows' fan meets. 
See how the stencil now dips into the previous fans?  You'll want to take care to end your marking lines where the fan below is.  I highly recommend that you mark the bottom while you are noticing.  It is very easy to forget and mark past the previous fan - Sheila ;)
 Once that fan is marked, move the stencil over and add the next fan.
Keep moving along right to left and bottom to top.  Of course you can mark them any way you wish, but this is a good basic fan placement design.

Here is how it looks when you are finished.
I used different sharpie markers to make this tutorial.  

I did big stitch quilting on my "Won't you be my Neighbor" quilt.

Here is a photo that I found of an old quilt.  The fans are colliding in the middle after being started on opposite sides of the quilt.  I would like to do one this way!
I offer my stencil at my Etsy shop, see button on the right sidebar.  Do you think this was helpful?   I think I'll make a page tab at the top for easy reference.

Happy Quilting!