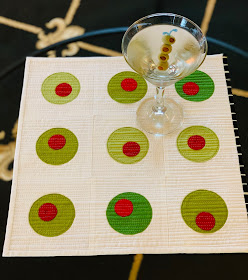
Finished size is about 12" square.
Let me start by saying these are the measurements that I used. Your quilt can be your measurements. You can make them smaller, larger or use different colors.
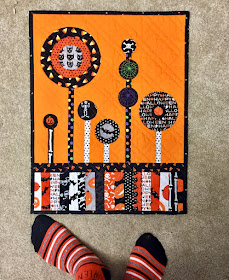
This is basic technique for all my lollipop quilts too. It all started with this quilt: Lollipop Garden which I made in 2010.
Lincoln Comes to Dinner - table runner
Trick or Sweet workshop sample.
Cut a background blocks 4 3/4". I used Moda Grunge White.
Prepare the circles. I like to use PaperPieces.com laser cut circles, but I use a lot of circles.
Karen Kay Buckley's Perfect Circles work very well too if you have them.
You can also cut your own. I use the subscription cards in magazines and trace the circles.The olive is 2 1/2" and the pimento is 1".
You need 9 of each size circle.
Cut your fabric circles about 1/4"larger all the way around the finished circle size. A smaller on the red one will work better. I used 3 different olive greens and a couple of different reds. The variations make it more interesting.
Sew a running stitch all around the circle. The smaller the berry the smaller the stitch length to get an even gather. You want to try to sew about 1/8" from the outside edge.
When finished it should look like this. Gently Gather and knot off near where you started stitching.
I would recommend you start with the larger circle.
Smooth your gather around the paper circle.
With a hot dry iron, starch your circles on both sides. Get a good sharp pressed edge.
You can make all the circles, or work as you go. Everyone works differently.
Now glue baste your pimento onto your olive. The method that I've developed is using a tiny line of white school glue about an 1/8" away from the edge.
Press it to set it wherever you like on the green circle. I made mine random and in different areas with one being almost in the center.
The thing I love the best about glue basting is NO PINS which is better for your machine and the berries stay nice and flat with no distortion.
Use matching thread on top and in bobbin, and lower your stitch length to achieve a smooth circle of stitching.
Top Stitch it all around going slowly and turning often. This takes a little practice, but going slow is the key. I pivot about every 2-3 stitches.
I received these white chocolate covered almonds in my stocking last Christmas. It is extra fun to have matching candy to your project. Or make a little of real olives to snack on.
Repeat this same process for all olives.
Use the same glue technique to baste your olive on the background square.
Press it to set it.Top stitch again.
Aren't they fun?
I made my little quilt with nine blocks.I machine quilted it with matchstick quilting using my walking foot.
I like to use a single fold binding on small quilts. Here is a tutorial for that process on my blog.
I decided to use a black and white stripe for one side of the binding. Why you ask? Just seemed to add a little glamour to it. After all Martinis are glamorous aren't they?
Please send me a photo barb.vedder@gmail.com or post your quilt on my Facebook page or instagram using the hashtag #quarantiniquiltA few people asked for the recipe of the Orange Crunch Cake that I made Andrew. Click here to get it. I use homemade buttercream frosting instead of the can and coolwhip.
I hope you had a nice Easter during this Strange time of Covid.
xo


SO CUTE!! I'll never make it but I think it's adorable.
ReplyDeleteThanks for the tutorial, Barb. I think everybody needs a quarantini mat...so cute!
ReplyDeleteSuper darling!Love the matching candy almonds! Have a great week!
ReplyDeleteThank you for the tutorial! I harvest a larger quilt that has circles now I know how to tackle it! I love your olive quilt. I know your quilt was for a martini- which I enjoy! But, I also thought of Mt Olive near the Garden of Gethsemane , that is so important this Easter holiday.
ReplyDeleteCute, cute, cute! Thanks for the tutorial. I saw monster googly eyes, might have to see if I can monster mini.
ReplyDeleteThanks, Bab, for the tutorial on the olive little quilt. Makes me thirsty just reading the instructions. It's only 10:00 a.m. and I have to admit it's too early for happy hour. But what a great little quilt. I always loved your lollipop quilt and now I can make my own. Thanks.
ReplyDeleteAnd I will definitely look at the orange crush cake recipe...
Hope you had a nice Easter.
ps: love your pressing surface fabric! Never met a toile I didn't love!!
xxxx
Such a great little quilt and a very good tutorial on circles!
ReplyDeleteThe cake sounds wonderful and I just may be making it this week!
Quarantini? LOL!! Thanks for sharing, Barb. What a cute little quilt (and a fantastic little tutorial to go with it!)
ReplyDeleteI always enjoy seeing what and how you make your cute quilts. Love your sense of humor!
ReplyDeleteYou are right--this is fun (and glamorous) quilt, but most of all, YOU are fun! Thanks for a great little quilt. This technique can be used far and wide, so thanks also for the in-depth tutorial.
ReplyDeleteI don't like to eat olives but do like your olive quilt.
ReplyDeleteI love olives (unless they are stuffed with something weird) and I love your little quilt--so fun! The orange cake looks so yummy too but I can't say the same about the Peeps--lol!
ReplyDeleteWhat a fun quilt Barb -- you always have the cutest ideas. I know you said you;\'re having trouble concentrating, but it sure looks like you're staying busy and having fun. Take Care - andThanks for the inspiration! XOXO
ReplyDeleteI love martinis and this quilt makes my mouth water for one... although I don't like olives with it, I prefer a twist of lemon!
ReplyDeleteWhat a fun quilt!
Oh thank you so much for this great tutorial as always !! Your quilt is beautiful and soooo fun !
ReplyDeleteI hope you're OK !!
Big hugs !
This is such a fun little quilt! I enjoyed your tutorial. Your cake looks delicious 😋
ReplyDeleteWhat a great tutorial and fun mini! Even though I've never had a martini it always reminds me of my Great Uncle George who was the master martini maker at family gatherings :) Cheers!
ReplyDeleteYou are amazing! Not only do you create a fabulous mini, but you share your method as well! Kudos my friend!! These are crazy times and a little (or in our case a lot) of levity goes a long way! Stay safe and healthy my friend.
ReplyDeleteI prepare my circles the same way... but mine don't always look that great, ha ha. You are always so generous with your great tips and tricks! Love the matching candy to your project:).
ReplyDeleteClever reference to Elizabeth Strout's novel! I loved those books, so different. Love your perfect olive mini and the quarantini hashtag--it's so wonderfully you!
ReplyDeleteI thought I'd left a comment the first time I saw your Quarantini Quilt, but apparently not. Suffice to say I LOVE it even though green olives are a no-no for my system.
ReplyDeleteWhat thread do you use for the quilting on the "Olives" quilt, please?
ReplyDelete