Hello! Sorry for the delay I ran away to Las Vegas with my daughter and I came home to a quilting trip.
Some of you may wonder how in the world this happened. I generally use a spray bottle to remove the blue lines as I quilt. All was fine until I hit that fabric which is a little older and obviously had not been pre-washed. ooops.
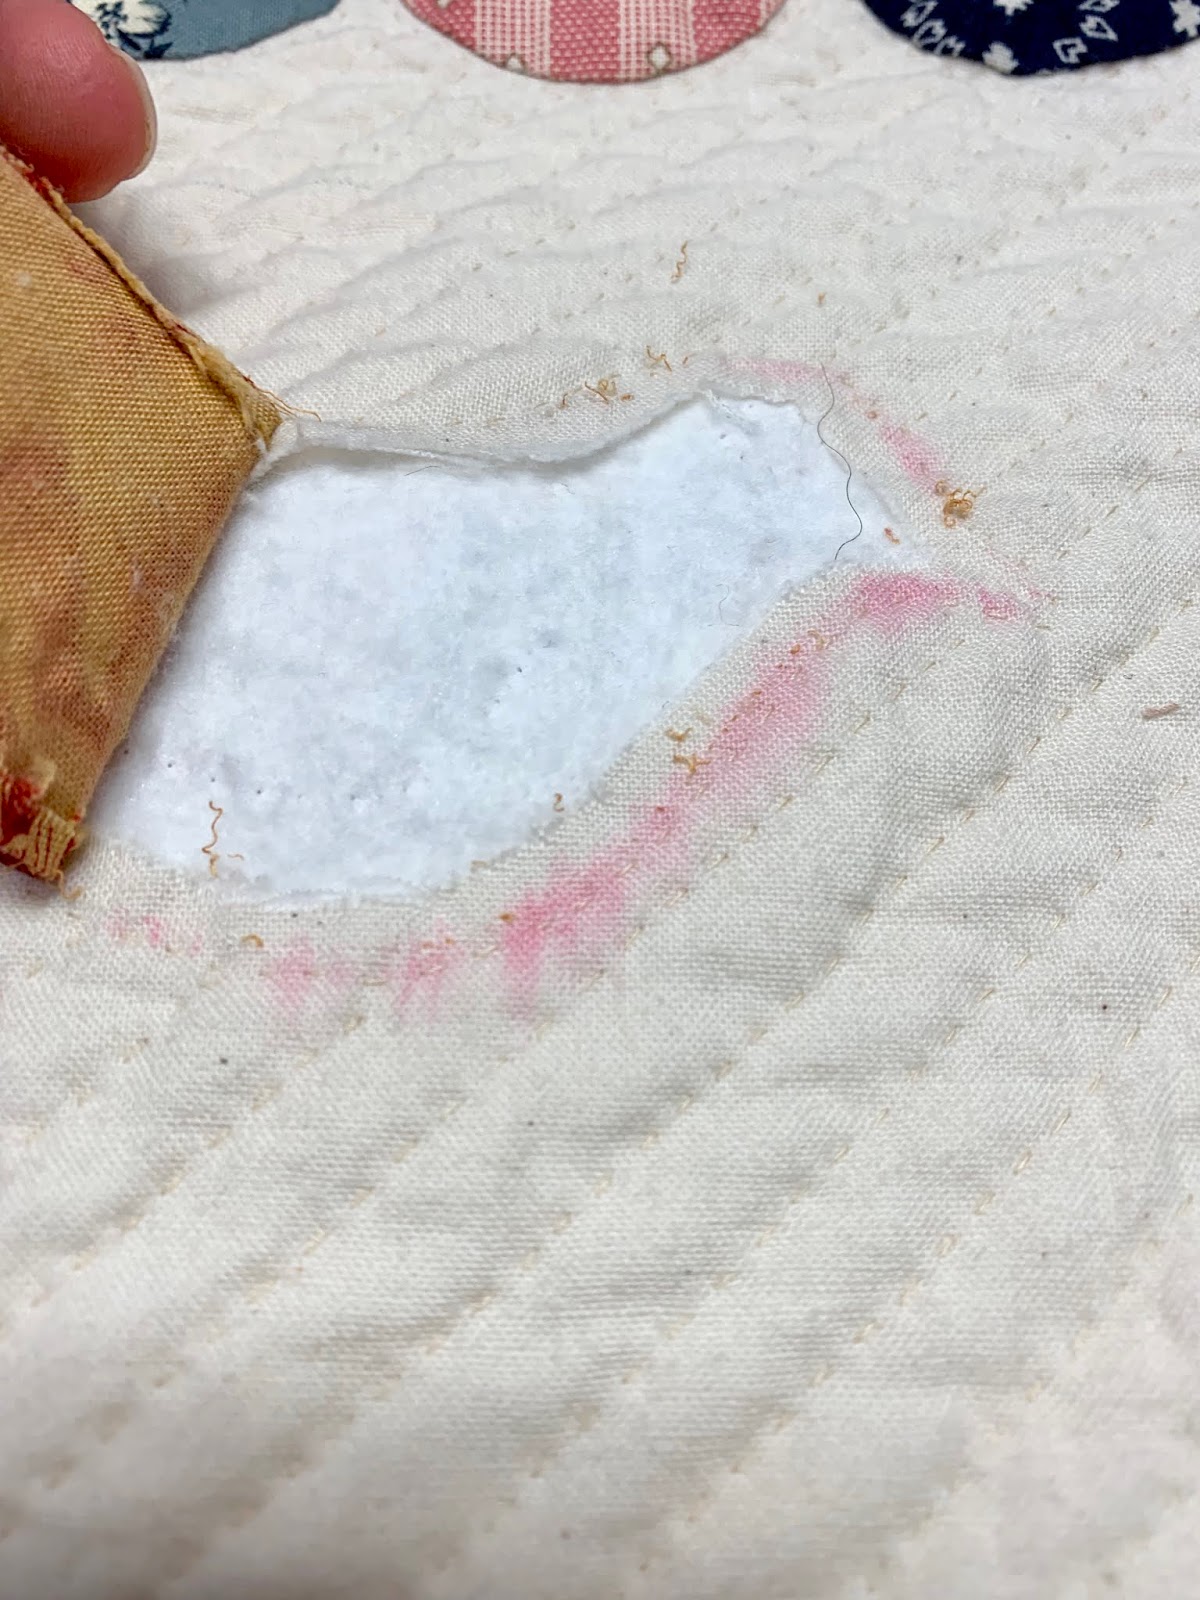
The first thing was to take off the bleeding bird. I carefully removed it with a new sharp seam ripper and tiny scissors. At this point I am grateful I outlined quilted the bird because it stabilized the area.
To spot treat the area, in a small bowl I made a mixture of:
Few drops of Dawn Dish washing Liquid
Oxi Clean
Water
I BLOTTED the stain with a white washcloth and let it sit. I watched it carefully and checked it often, then blotted it with clean water.
Here you can see the the Dawn mixture on the stain.
I treated this problem for 3 days!
Uh Oh!! now I have a water stain but you can see that the bleed is coming out.
After it is dried, it looks good to me. I still see a pink shadow and water stain but feel (hope and pray) it will come out in the tub.
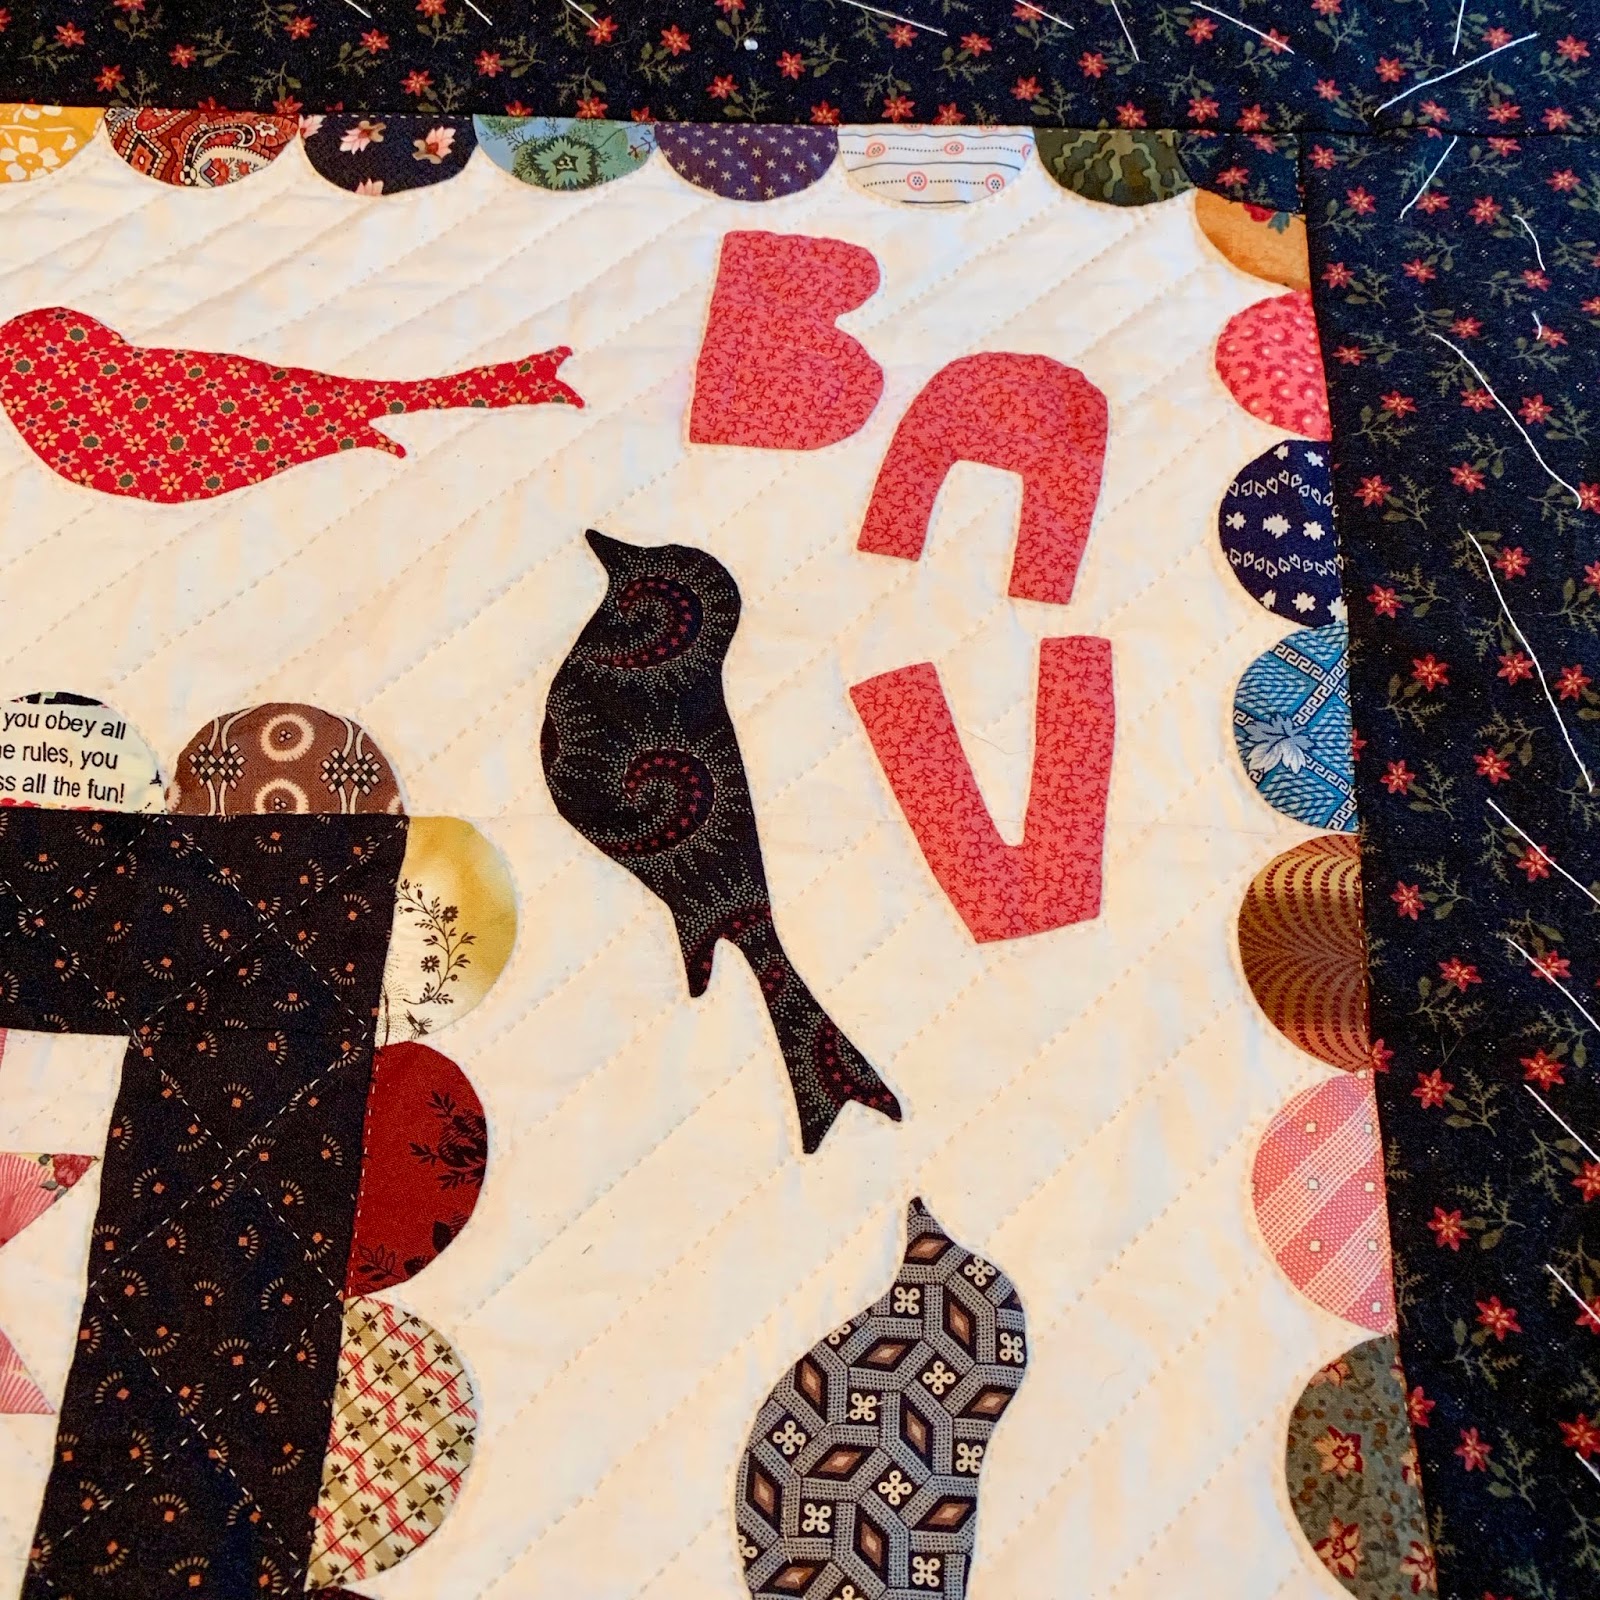
Ta-Da! Here is the new bird which has carefully been appliqued into the space. I did have re-quilt the outline a little, but it was a good fix.
okay, into the tub. (See the process in my last post) During the first rinse there was a release of other reds but it all went down the drain. Yay
After I gently squeezed out all the water I could, I carefully loaded the wet quilt into a plastic laundry basket to take it down to my washer so I wouldn't put strain on it. A wet quilt is very heavy!
I loaded it into my washer and used the rinse and spin cycle, no detergent and let the washer spin out more water.
(
BEFORE you dry it, check it for any other bleeding. If you have any, back to tub you go for a longer soak.)
I put it in the dryer on low and literally stood there to make sure it didn't twist or ball up. I let it tumble for about 10 minutes until it was damp dry.
I placed a clean sheet on top of carpeting and spread the quilt on top tugging gently and smoothing to block it. I usually set up 2 oscillating fans on the floor to help in the drying. I check often to make sure it is keeping its square shape. (I have done this in the basement and spare a bedroom where I can close the door because; coco and nutmeg)
It may take several days to dry. I flipped it over and dried it back side up too.
Here are a few more process photos. The quilting lines before I decided to double them.
It was worth adding the extra lines. I like so much better!
I like this photo as it shows the bird before it bled. As you can see it is a prominent place.
A lot of people have commented on my clamshell edged border. It's funny I thought I was first to use them this way, but I recently saw a quilt on line with this design made before mine. There you go; nothing is new.
Here is how I lined them up.
I sew basted them in place (by machine) long the edge.
I hope that answered most of you questions, if not just leave me a comment and I'll answer them.
I took Coco to the Beach Saturday. I love a cloudy gloomy day at the Sound. We had the beach to ourselves.
I wonder how old this shell is. It was crusted with tiny shells and other sea bits.
It really demonstrates how the tides and time works on shells.
This poor jelly washed up. I very carefully rolled it back into the water. I hope it lived.
Thanks for so many of the nice comments on my quilt and have a great week!
xo


28 comments:
Wow! Nice job on the repair/fix of the bleeding bird. It's too bad we have to worry about bleeding fabric these days!!
Love seeing how you took care of it. Your quilt is a real beauty and labor of love!
It was time consuming but it worked. I love how you share your journey. Hugs
Thank you so much for the "story". Your knowledge is quite the resource for us even though I'm more into fast and easy these days (75 years old). I love piecing so that is my method of choice these days. I share your knowledge with the younger quilters that I know. So happy the little birds are all well and singing now.
Thank you for sharing the process. I know (unfortunately) that there will be another red stain from bleeding fabric somewhere in my future. This will definitely help me when the time comes. Again, your quilt is fabulous.
Good save! I know how frustrating it is, but you have saved it beautifully. Thanks for sharing your solution. I love how you quilted that little black bird in the corner by simply following the swirly pattern. So sweet!
Great save on your sick birdie (;000) you really did a great job ..
Do you wash all your fabrics? hugs, Julierose
Your quilt is fantastic! You have a special way with fabric stories.:) So glad you were able to save your quilt. I have started to do the long soak on any suspicious fabrics before I even cut them up and put them into a quilt! Just too frustrating to deal with a bleed after all that work!
I have to say it's one of my favorite quilts you've shared!! And your title? Bleeding Heart (I've been given that name many times!)...and I always laugh at your bathtub picture... All those cleaning products!!! So glad you were able to solve the bleed! WHEW! What a process.
When I grew up in NY, I used to LOVE to go to Jones Beach in the winter. Such an amazing feeling. Love your picture with Coco!
xxxx
So happy to know that the red all came out. Lots of extra work involved though. I have used a Q-tip dipped in bleach to dab a precise spot. It worked well. I hope you never have to use this tip, ever. May all your quilts be free of bleeding ink. ;^)
Retayne, retayne, retayne....
I always wash my quilts , including antique quilts, in it. Never a problem.
Always love to see your finishes
A stellar repair job, Barb! Glad you were able to make t work--it is such an incredible quilt!
I don't get to beaches very often, but I love them on cloudy days.
Fantastic repair job. Thank you so much for sharing so many pictures of it. Glad it worked out so well, it is such a beautiful quilt.
Great quilt fix although heart-stopping, patient and tedious process. A happy outcome in the end and a good lesson on repairs. Your extra row of quilting does add much more interest to the quilt. Thanks for taking the time to write an informative post.
Your repair worked beautifully! Thanks for sharing all that went into making that bleed disappear. So intense at times! I like that extra row of quilting and the way you basted those clamshells on the border :)
Such beautiful work, Barb! So glad your quilt is back to being perfect!
a labor intensive albeit successful fix...beautiful quilt...love the ocean pix...i am deathly homesick for the shore....
Ann and I are up in NH with some friends for a quilt retreat. We're talking about your blog. You give such great tutorials! Thank you. The quilt is stunning. Off to Keepsake today.
true, true, true, but I myself have never used it. I will try it - thanks!
Wow- looks like you did everything right to address the problem, though it was a lot of work. Quite the array of laundry products lined up on the edge of the tub. Have you tried using wool dryer balls to help extract moisture and keep the quilt from balling up? I just found mine again, and plan to use them more often. Oh, that shell- how amazing!
Good save! I recently won a FQ of that offending fabric in a swap game at quilt camp--I'm going to make sure to pre-wash it today before I forget--lol!
Great save. No one will ever know what happened. Finding a spot where the fabric has bled is always shocking. Your quilt is beautiful and the clam shell border is fabulous.
Wow, what an amazing quilt! All that applique - eek! heheh... seriously, I SO admire those of you who can do that. I love the birds! Every fabric you chose is wonderful. And your hand quilting is perfect! Good grief, I could go on and on. Nice save on th bleeding bird, and thanks for sharing your process. I'm sure it will come in handy for many of us.
Wow this is a gorgeous quilt! I am glad the bleeding came out. I wouldn't have thought about taking the bird off but it is a good idea to avoid more bleeding. I hope I remember that when I have that problem. The double lines on the quilting do add a lot to the quilt.
Another great post, and so much to learn through your process - the surgery, the washing. You treat your quilts with the tender loving care they deserve. Amazing attention to detail! Nice beach walk in moody weather - the best kind.
Thank you for sharing all the steps but... pfewwww... it must be stressful !!
Congratulations again and again for your gorgeous quilt !
Oh my goodness, your heart must have skipped a beat! I love how you calmly dealt with it, your patience paid off. Once again it is a beautiful quilt and I know someday I will see it in person (-;
You add a tiny bit to wash water
It will never fail you
I admire allllll your finishes !
Beautiful work
Fantastic job at saving the quilt from the bleeding. Love your birds! AND love your toile fabric behind that row of border... is that your ironing board?
Post a Comment